Is WordPress still relevant 2023?

Is WordPress still relevant 2023?

WordPress

As of my knowledge update , WordPress remained a highly popular and relevant platform for building websites and blogs. However, the relevance of any technology can change over time, and it’s essential to consider several factors when evaluating its in 2023:

  1. Market Share: WordPress had a significant market share in the website and content management system (CMS) space. Its widespread use and a vast ecosystem of themes, plugins, and developers made it a go-to choice for many.
  2. Community and Development: WordPress has a large and active community of users and developers who continually work on improving and maintaining the platform. This community support is a significant factor in its relevance.
  3. Gutenberg: In 2018, WordPress introduced the Gutenberg editor, a block-based editing system that modernized the way content is created and edited. This development aimed to keep WordPress competitive in the evolving web landscape.
  4. Adaptation to New Technologies: WordPress has a history of adapting to new web technologies and standards. It has made efforts to remain relevant with mobile responsiveness, SEO, and security features.
  5. Competition: New website builders and CMS platforms have emerged in recent years, offering alternative solutions. Some of them provide more streamlined and user-friendly experiences for those who are not web development experts.
  6. E-commerce and Advanced Needs: WordPress can be extended with plugins like Woo Commerce for e-commerce. However, for businesses with complex e-commerce needs, other platforms like Shopify or Magneto may be more suitable.
  7. Security and Performance: WordPress’s security and performance depend on how well it is configured and maintained. Some criticize it for being more vulnerable to security issues if not properly managed.
  8. Customization: WordPress’s flexibility for customization is one of its strengths. Still, for those who require highly unique designs and functionality, more advanced development skills may be necessary.

To determine WordPress’s current relevance in 2023, you should consider your specific needs and goals for your website. WordPress may still be a suitable choice for many projects, but it’s essential to assess the latest developments, the competition, and any changes or updates that have occurred in the intervening years.

Wordfence vs Sucuri – Best WordPress Security Plugin?

Wordfence vs Sucuri – Best WordPress Security Plugin?

WordPress

Sucuri and Word fence are two popular security plugins for WordPress, and both offer valuable features to enhance the security of your website. However, it ultimately depends on your specific needs and preferences. Here’s a comparison of the two plugins:

  1. Features: Both Sucuri and Word fence provide a range of security features such as malware scanning, firewall protection, and login security. They offer real-time monitoring and notifications for potential threats.
  2. Malware Detection and Removal: Sucuri specializes in website security and offers a highly regarded malware detection and removal service. They have a team of experts who can help you clean up your website in case of an infection. Word fence also provides malware scanning and removal capabilities, but Sucuri has a dedicated focus on this aspect.
  3. Firewall Protection: Both plugins offer firewall protection, but they use different approaches. Sucuri operates through a cloud-based firewall, which filters traffic before it reaches your website, protecting against D Dos attacks and other malicious activity. Word fence, on the other hand, has an application-level firewall that runs on your WordPress site.
  4. Performance Impact: Since Sucuri’s firewall operates in the cloud, it generally has a minimal impact on your website’s performance. Word fence’s firewall runs directly on your site, which may slightly impact performance, especially on resource-intensive websites.
  5. Pricing: Sucuri and Word fence have different pricing models. Word fence offers a free version with limited features and a premium version with additional functionalities. Sucuri, however, is primarily a subscription-based service, and the pricing varies depending on the level of protection you require.
  6. User-Friendliness: Both plugins are relatively easy to use and offer user-friendly interfaces. However, the user experience may vary based on personal preferences.

Ultimately, the choice between Sucuri and Word fence depends on your specific requirements, budget, and preference for certain features. It may be helpful to evaluate your website’s needs, consider the features offered by each plugin, and try out their free versions or trial periods to determine which one aligns best with your security goals.

Hike up your revenue with these Woo-commerce marketing strategies

Hike up your revenue with these Woo-commerce marketing strategies

WordPress

Here are some effective marketing strategies to help you increase revenue using Woo Commerce:

1. Optimize Your Product Pages:

Make sure your product pages are well-optimized for Search Engine Optimization, with clear and compelling product descriptions, high-quality product images, and easy-to-understand pricing information. This will help you rank higher in search engine results pages and make it easier for potential customers to find and buy your products.

2. Offer Discounts and Promotions:

Discounts and promotions are a great way to incentivize customers to make a purchase. You can offer discounts on certain products, create coupon codes, or offer free shipping for orders over a certain amount. You can also run seasonal promotions to encourage customers to buy during peak shopping periods.

3. Use Social Media:

Social media is a powerful marketing tool that can help you reach a wider audience and drive more traffic to your Woo-commerce store. Use social media platforms like Facebook, Instagram, and Twitter to showcase your products, share customer reviews and feedback, and promote your sales and promotions.

4. Leverage Email Marketing:

Email marketing is a cost-effective way to reach your customers directly and promote your products. Use email campaigns to highlight new products, offer discounts and promotions, and share exclusive content with your subscribers.

5. Encourage Reviews and Referrals:

Positive customer reviews and referrals can be a powerful marketing tool for your Woo-commerce store. Encourage your customers to leave reviews on your product pages or on third-party review sites, and offer incentives for referrals to help spread the word about your business.

6. Optimize for Mobile:

With more and more consumers shopping on their mobile devices, it’s essential that your Woo-commerce store is optimized for mobile users. Make sure your site is responsive and loads quickly on mobile devices, and offer a seamless mobile checkout experience to help boost conversions.

By implementing these strategies, you can effectively market your Woo-commerce store and drive more sales, ultimately increasing your revenue.

How to change favicon color for dark mode in WordPress?

How to change favicon color for dark mode in WordPress?

WordPress

To change the fav-icon color for dark mode in WordPress, you can follow these general steps. Keep in mind that these steps may vary slightly depending on your WordPress theme and the tools available in your WordPress installation.

      1-Identify Dark Mode Styles:

    • Some WordPress themes come with built-in support for dark mode, and they may have specific CSS styles for dark mode. Check your theme documentation or inspect the dark mode styles using browser developer tools.2-Inspect Fav-icon Code:
      • Use your browser’s developer tools to inspect the HTML code related to your favicon. Typically, you’ll find it in the <head> section of your HTML.
        3-Add Custom CSS:

        • Once you’ve identified the dark mode styles and located the favicon code, you can add custom CSS to change the favicon color specifically for dark mode. You can do this using the built-in Customizer or a custom CSS plugin.
        • In the WordPress Customizer:
          • Navigate to “Appearance” > “Customize” in your WordPress dashboard.
          • Look for a “Additional CSS” or similar option.
          • Add CSS code to target the favicon in dark mode. For example:

            @media (prefers-color-scheme: dark) {
            /* Your dark mode favicon styles here */
            #your-favicon-id {
            filter: brightness(50%); /* Adjust the brightness as needed */
            }
            }

            • Replace #your-favicon-id with the actual ID or class of your favicon.
        • Using a Custom CSS Plugin:
          • Install and activate a custom CSS plugin like “Simple Custom CSS” or “Customizer CSS.”
          • Go to the plugin settings or a dedicated section in your dashboard.
          • Add the CSS code similar to the example above.

            4-Save Changes:

            • After adding the custom CSS, save the changes, and preview your site in dark mode. Adjust the CSS as needed to achieve the desired fav-icon color in dark mode.

Remember that the exact steps and options may vary depending on your WordPress theme and any customization tools or plugins you have installed. Always test changes on a staging site or make a backup before applying them to a live site.For more help you can contact us or hire our developer for solution. For hire our developer Whats App us +91-9772733337 , Skypeajaymaanju71, email-ajaymaanju1990@gmail.com

Code Snippets WordPress Plugin uses ?

Code Snippets WordPress Plugin uses ?

WordPress

The “Code Snippets” WordPress plugin allows you to add custom code snippets to your WordPress site without having to edit the theme’s functions.php file directly. The plugin provides an interface for managing code snippets and offers various features to help you organize and execute the code.

Some of the common code snippets that can be added to WordPress using this plugin include:

  1. Custom Functions: You can use this plugin to add custom PHP functions to your WordPress site, which can be useful for modifying the default behavior of WordPress or adding new functionality.
  2. CSS and JavaScript: You can add custom CSS or JavaScript code to your WordPress site using this plugin, which can be used to style your site or add interactivity to your pages.
  3. Shortcodes: This plugin allows you to create custom shortcodes that can be used to add complex functionality to your site with just a few lines of code.
  4. Plugin and Theme Modifications: You can use this plugin to modify the behavior of other plugins or themes by adding custom code snippets that interact with their functions.
  5. Database Modifications: You can use this plugin to modify the WordPress database by adding custom SQL queries, which can be used to update or delete data from your site’s database.

Overall, the “Code Snippets” plugin is a powerful tool for adding custom code to your WordPress site without having to modify your theme’s files directly.

Code Snippets WordPress Plugin Pro Version

The “Code Snippets” WordPress plugin has a Pro version that offers additional features and functionality beyond the free version. Some of the features available in the Pro version include:

  1. Import and Export: You can easily import and export code snippets to and from your WordPress site using the Pro version, making it easy to move snippets between sites or backup your snippets.
  2. Syntax Highlighting: The Pro version includes syntax highlighting for code snippets, making it easier to read and edit your code.
  3. Code Execution: You can execute code snippets directly from the plugin’s interface in the Pro version, making it easy to test and debug your code.
  4. Multisite Support: The Pro version includes support for WordPress Multi site, allowing you to manage code snippets across multiple sites from a single interface.
  5. Scheduled Snippets: You can schedule code snippets to run at specific times using the Pro version, making it easy to automate tasks or perform maintenance on your site.
  6. Custom Categories: The Pro version allows you to create custom categories for your code snippets, making it easier to organize and manage your code.
  7. Code Templates: The Pro version includes pre-built code templates for common tasks, making it easy to add functionality to your site without having to write code from scratch.

Overall, the Pro version of the “Code Snippets” plugin offers a range of powerful features that can help you manage and execute custom code on your WordPress site more efficiently.

Best WordPress Plugin 2023

Frontity Framework Advantage

Frontity Framework Advantage

WordPress

Frontity is a free, open-source framework for building fast and responsive WordPress Websites with React. It is designed to simplify the process of creating WordPress Websites by providing a set of pre-configured tools and features that work seamlessly with React.

Frontity uses React as its core library for building user interfaces, which allows developers to create dynamic and responsive websites with ease. It also integrates with WordPress to provide a seamless content management experience, allowing developers to fetch and display content from their WordPress site using the WordPress REST API.

One of the key benefits of using Frontity is its performance. It uses server-side rendering and dynamic preloading to ensure that websites built with Frontity load quickly and efficiently. It also provides a range of performance optimizations out-of-the-box, such as lazy loading and image optimization.

Frontity is fully customizable and extensible, allowing developers to create custom themes and plugins that work seamlessly with the framework. It also has a growing community of developers who contribute to the project and provide support to other users.

Overall, Frontity is a powerful and flexible framework for building fast and responsive WordPress websites with React. Its ease of use, performance optimizations, and extensibility make it a popular choice for developers looking to build modern WordPress Websites.

How create website in WordPress and react with help of frontity ?

To create a website in WordPress and React using Frontity, you can follow these steps:

  1. Install WordPress: You’ll need to have a WordPress Website up and running. You can either install WordPress on a local development environment or on a web hosting service.
  2. Install and configure the Frontity plugin: Install the Frontity plugin on your WordPress website and configure it according to your needs. The plugin will handle the communication between your WordPress website and the Frontity React app.
  3. Install and configure Frontity: Install Frontity using the command line interface (CLI) and configure it to connect with your WordPress website. You’ll need to specify the URL of your WordPress website and the REST API endpoint.
  4. Choose a starter theme: Frontity offers several starter themes that you can use to kickstart your project. Choose a theme that best fits your needs and modify it as necessary.
  5. Develop your custom theme: Use React to build your custom theme. You can leverage the features provided by Frontity, such as routing, state management, and server-side rendering, to create a fast and responsive website.
  6. Test and deploy: Test your website thoroughly to ensure that it works as expected. Once you’re satisfied with the result, deploy your website to a web hosting service.
  7. Maintain and update: Maintain your website by keeping your plugins, themes, and WordPress core up to date. Also, stay up to date with the latest version of Frontity to take advantage of new features and bug fixes.

By following these steps, you can create a website in WordPress and React using Frontity. With Frontity, you can leverage the power of React to create fast and responsive websites that integrate seamlessly with WordPress.

How frontity is different from WordPress and React ?

Frontity is different from WordPress and React in several ways:

  1. WordPress vs Frontity: WordPress is a content management system (CMS) that provides a platform for creating and managing websites. Frontity, on the other hand, is a framework for building WordPress websites with React. While WordPress provides a full-stack solution for website development, Frontity focuses specifically on the front-end, allowing developers to build fast and responsive websites with React that integrate seamlessly with WordPress.
  2. React vs Frontity: React is a popular JavaScript library for building user interfaces. Frontity, on the other hand, is a framework that provides a set of pre-configured tools and features for building fast and responsive WordPress websites with React. While React provides the building blocks for creating user interfaces, Frontity provides a higher-level framework that streamlines the development process and provides performance optimizations out-of-the-box.
  3. Performance: Frontity is designed to deliver fast and responsive websites. It uses server-side rendering and dynamic preloading to ensure that websites built with Frontity load quickly and efficiently. WordPress and React, on the other hand, do not provide these performance optimizations out-of-the-box.
  4. Flexibility: Frontity is fully customizable and extensible, allowing developers to create custom themes and plugins that work seamlessly with the framework. This flexibility allows developers to create websites that meet their specific needs. WordPress and React, on the other hand, are more rigid in their architecture, and require developers to work within their respective paradigms.

Overall, Frontity is a specialized framework for building fast and responsive WordPress websites with React, while WordPress and React are more general-purpose solutions for website development. While Frontity provides a streamlined development experience and performance optimizations out-of-the-box, WordPress and React offer greater flexibility and a wider range of use cases.

Benefits of using frontity in WordPress Website ?

There are several benefits of using Frontity in a WordPress website:

  1. Fast and responsive: Frontity is designed to deliver fast and responsive websites. It uses server-side rendering and dynamic preloading to ensure that websites built with Frontity load quickly and efficiently.
  2. Improved performance: Frontity provides a range of performance optimizations out-of-the-box, such as lazy loading and image optimization. These optimizations can help improve the performance of your WordPress website, which can lead to better search engine rankings and increased user engagement.
  3. Seamless integration with WordPress: Frontity integrates seamlessly with WordPress, allowing developers to fetch and display content from their WordPress site using the WordPress REST API. This provides a great content management experience for website administrators and editors.
  4. Flexibility: Frontity is fully customizable and extensible, allowing developers to create custom themes and plugins that work seamlessly with the framework. This flexibility allows developers to create websites that meet their specific needs.
  5. Developer-friendly: Frontity is designed with developers in mind. It uses modern tools and technologies, such as React, Webpack, and Babel, which can help improve developer productivity and reduce development time.
  6. Growing community: Frontity has a growing community of developers who contribute to the project and provide support to other users. This community can be a valuable resource for developers who are just getting started with Frontity.

Overall, Frontity can help improve the performance, flexibility, and developer experience of a WordPress website. It provides a modern, fast, and responsive framework for building WordPress websites with React.

PWA For WordPress Websites

Progressive Web App(PWA) for WordPress Websites

Progressive Web App(PWA) for WordPress Websites

WordPress

Yes, it is possible to create a Progressive Web App (PWA) for WordPress websites. A PWA is a web application that uses modern web technologies to deliver a native-like experience to users, including features like offline caching, push notifications, and the ability to be installed on a user’s device as a standalone app.

To create a PWA for your WordPress website, you can use a variety of tools and plugins that are available. Here are a few options:

  1. PWA for WP & AMP: This plugin allows you to create a PWA for your WordPress website and AMP pages, with features like offline caching, push notifications, and more.
  2. Super PWA: This plugin allows you to turn your WordPress website into a PWA, with features like an app icon, splash screen, and offline support.
  3. WP-App Kit: This plugin allows you to create a PWA or native app for your WordPress website, with customizable themes and features like push notifications, offline caching, and more.

These are just a few of the many tools and plugins available for creating a PWA for your WordPress website. By using a PWA, you can provide your users with a fast and seamless experience, while also improving your website’s performance and functionality.

What is progressive Web App(PWA) ?

A Progressive Web App (PWA) is a type of web application that uses modern web technologies to provide users with a native app-like experience on the web. PWAs are designed to be fast, reliable, and engaging, and they have several features that are commonly associated with native apps, such as offline caching, push notifications, and the ability to be installed on a user’s home screen.

One of the main benefits of PWAs is that they work on any device with a modern web browser, regardless of the operating system. This means that developers can create a single PWA that works on both Android and IOS devices, as well as desktop computers and other devices.

PWAs are built using web technologies like HTML, CSS, and JavaScript, and they are designed to be responsive and adapt to different screen sizes and device types. They also use a service worker, which is a JavaScript file that runs in the background and allows PWAs to cache content and provide offline support.

Overall, PWAs offer a compelling alternative to native apps, as they are faster and easier to develop, while still providing many of the same features and benefits to users.

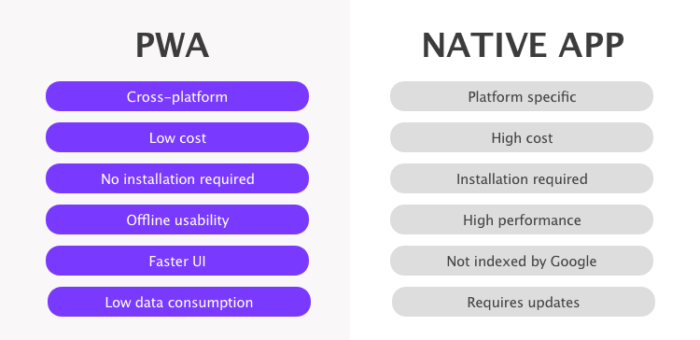
Is there any difference for PWA App and Native App ?

Yes, there are several differences between Progressive Web Apps (PWAs) and Native Apps.

  1. Platform compatibility: Native apps are built specifically for a particular platform, such as iOS or Android, while PWAs are web apps that can be accessed on any device with a modern web browser.
  2. App Distribution: Native apps are typically distributed through app stores like the Apple App Store or Google Play, while PWAs can be accessed directly through a web browser or installed on a user’s home screen like a Native App.
  3. Installation and Updates: Native apps must be downloaded and installed on a user’s device, while PWAs can be accessed immediately through a web browser. Additionally, PWAs can be updated automatically, without requiring the user to download and install an update.
  4. Performance: Native Apps typically have better performance and can access device-specific features like the camera and GPS, while PWAs are limited to the capabilities of the web browser and may not be able to access certain hardware features.
  5. Development time and cost: Developing a native app requires separate development for each platform, which can be time-consuming and expensive, while PWAs can be developed more quickly and cost-effectively using web technologies.

In summary, while both PWAs and native apps provide app-like experiences to users, they differ in terms of platform compatibility, app distribution, installation and updates, performance, and development time and cost.

Can we upload PWA App on Google play store and App store for download ?

Yes, it is possible to upload a Progressive Web App (PWA) to both the Google Play Store and Apple App Store. However, there are some limitations and considerations to keep in mind:

  1. Google Play Store: As of now, Google Play Store only allows PWAs to be uploaded if they are wrapped in a native Android app using a tool called Trusted Web Activities. This means that the PWA must be embedded within a native app, which serves as a wrapper for the PWA. Additionally, not all Android devices support Trusted Web Activities, so the app may not be available on all devices.
  2. Apple App Store: Apple allows PWAs to be submitted to the App Store as long as they meet certain criteria, including being built with web technologies and providing a native-like experience to users. However, PWAs submitted to the App Store are not actually installed on the user’s device like a native app; instead, they are accessible through a web view within a Native App wrapper.

In summary, while it is possible to upload PWAs to both the Google Play Store and Apple App Store, there are limitations and considerations to keep in mind, including the need for a Native App wrapper on Android and the fact that PWAs submitted to the App Store are not installed on the user’s device.

WordPress Website Migration

How to create Stage server and migration of WordPress websites?

How to create Stage server and migration of WordPress websites?

WordPress
  1. Create a subdomain or a sub-directory on your hosting account where you will host your staging website. You can do this by logging in to your c Panel or other hosting control panel and creating a new subdomain or sub-directory.
  2. Install WordPress on the staging server using the same version of WordPress that you are currently using on your live website. You can do this by using the auto-installer provided by your hosting provider or by manually installing WordPress.
  3. Install a plugin like Duplicator or All-in-One WP Migration on your live website. These plugins will create a backup of your website that you can use to migrate it to the staging server.
  4. Create a backup of your live website using the plugin you installed in step 3. This backup will include all your WordPress files, database, and settings.
  5. Download the backup file to your computer and then upload it to the staging server using FTP or the file manager provided by your hosting provider.
  6. Install the same plugin you used to create the backup on the staging server and then use it to import the backup file you uploaded in step 5.
  7. Once the backup is imported, update the site URL in the WordPress settings to match the URL of your staging server. You can do this by going to Settings > General and updating the WordPress Address (URL) and Site Address (URL) fields.
  8. Test your staging website thoroughly to ensure that everything is working properly. You can make changes to the staging website without affecting your live website.
  9. Once you are satisfied with the changes you have made to the staging website, you can migrate them to the live website. You can do this by following the same steps you used to create the backup and upload it to the staging server, but in reverse.
  10. Once the migration is complete, test your live website thoroughly to ensure that everything is working properly.

Remember to take a backup of your live website before making any changes to it, and keep in mind that any changes you make to the staging website will not be reflected on the live website until you migrate them.

WordPress Websites Security

Best Security Plugins For WordPress Websites 2023

Best Security Plugins For WordPress Websites 2023

WordPress

Best security plugins for WordPress based on their reputation and popularity as of my knowledge are –

  1. Wordfence Security – Wordfence is one of the most popular security plugins for WordPress, with over 4 million active installations. It offers features such as firewall protection, malware scanning, login security, and real-time traffic monitoring.
  2. Sucuri Security – Sucuri is another popular security plugin with over 600,000 active installations. It provides features such as malware scanning, blacklist monitoring, file integrity monitoring, and post-hack security actions.
  3. iThemes Security – iThemes Security (formerly known as Better WP Security) has over 1 million active installations. It provides features such as malware scanning, brute force protection, two-factor authentication, and file change detection.
  4. All In One WP Security & Firewall – All In One WP Security & Firewall has over 800,000 active installations. It offers features such as login protection, file system security, database security, and firewall protection.
  5. Jetpack Security – Jetpack Security is a security plugin offered by the makers of WordPress.com. It provides features such as brute force protection, malware scanning, and spam filtering.

Below are pro version of few plugins with yearly prices

  1. Sucuri Security Pro – Sucuri is a popular security plugin, and their Pro version offers additional features such as website backup, CDN, and DDoS protection. It starts at $199.99 per year.
  2. MalCare – MalCare is a security plugin that uses artificial intelligence to detect and remove malware from your website. It offers features such as firewall protection, brute force protection, and website management tools. Pricing starts at $99 per year.
  3. Jetpack Security – Jetpack offers a security plugin that includes real-time backups, spam protection, and automated malware scanning. Pricing starts at $7.95 per month.
  4. Wordfence Premium – Wordfence is a popular security plugin, and their Premium version offers additional features such as country blocking and two-factor authentication. Pricing starts at $99 per year.
  5. iThemes Security Pro – iThemes Security offers a Pro version that includes features such as two-factor authentication, Google reCAPTCHA, and malware scanning. Pricing starts at $80 per year.

It’s important to note that while these plugins can enhance the security of your WordPress site, they shouldn’t be relied on as the sole means of protection. It’s important to also keep your WordPress installation, themes, and plugins updated and to use strong passwords and security practices.

Best WordPress Themes 2023

What PHP 8.2 Update Includes ?

What PHP 8.2 Update Includes ?

WordPress

PHP 8.2 is a major update to the PHP programming language, and it comes with a number of new features and improvements. Here are some of the pros and cons of the PHP 8.2 update:

Pros:

  1. Improved type handling: PHP 8.2 comes with better support for union types and improved type inference, making it easier to write and maintain code that is type-safe.
  2. Faster performance: PHP 8.2 includes several optimizations that can significantly improve the performance of your PHP applications.
  3. Enhanced security: PHP 8.2 includes several security improvements, including better handling of user input and better protection against common web application attacks.
  4. Improved error handling: PHP 8.2 includes better error handling capabilities, making it easier to detect and fix errors in your code.
  5. New language features: PHP 8.2 introduces several new language features, such as a new “match” expression that simplifies conditional logic and a new “static return type” that makes it easier to write generic code.

Cons:

  1. Compatibility issues: Upgrading to PHP 8.2 may cause compatibility issues with older PHP code that relies on deprecated features or functions.
  2. Learning curve: The new features and improvements in PHP 8.2 may require some learning and adjustment for developers who are used to working with older versions of PHP.
  3. Third-party library support: Some third-party libraries and extensions may not be fully compatible with PHP 8.2 yet, which could cause issues for developers who rely on these libraries.

Overall, the pros of the PHP 8.2 update outweigh the cons, as the new features and improvements can significantly improve the performance, security, and maintainability of PHP applications. However, it is important to carefully consider the potential compatibility issues and learning curve before upgrading to PHP 8.2

WordPress Website Security